Follow Me On Social Media!
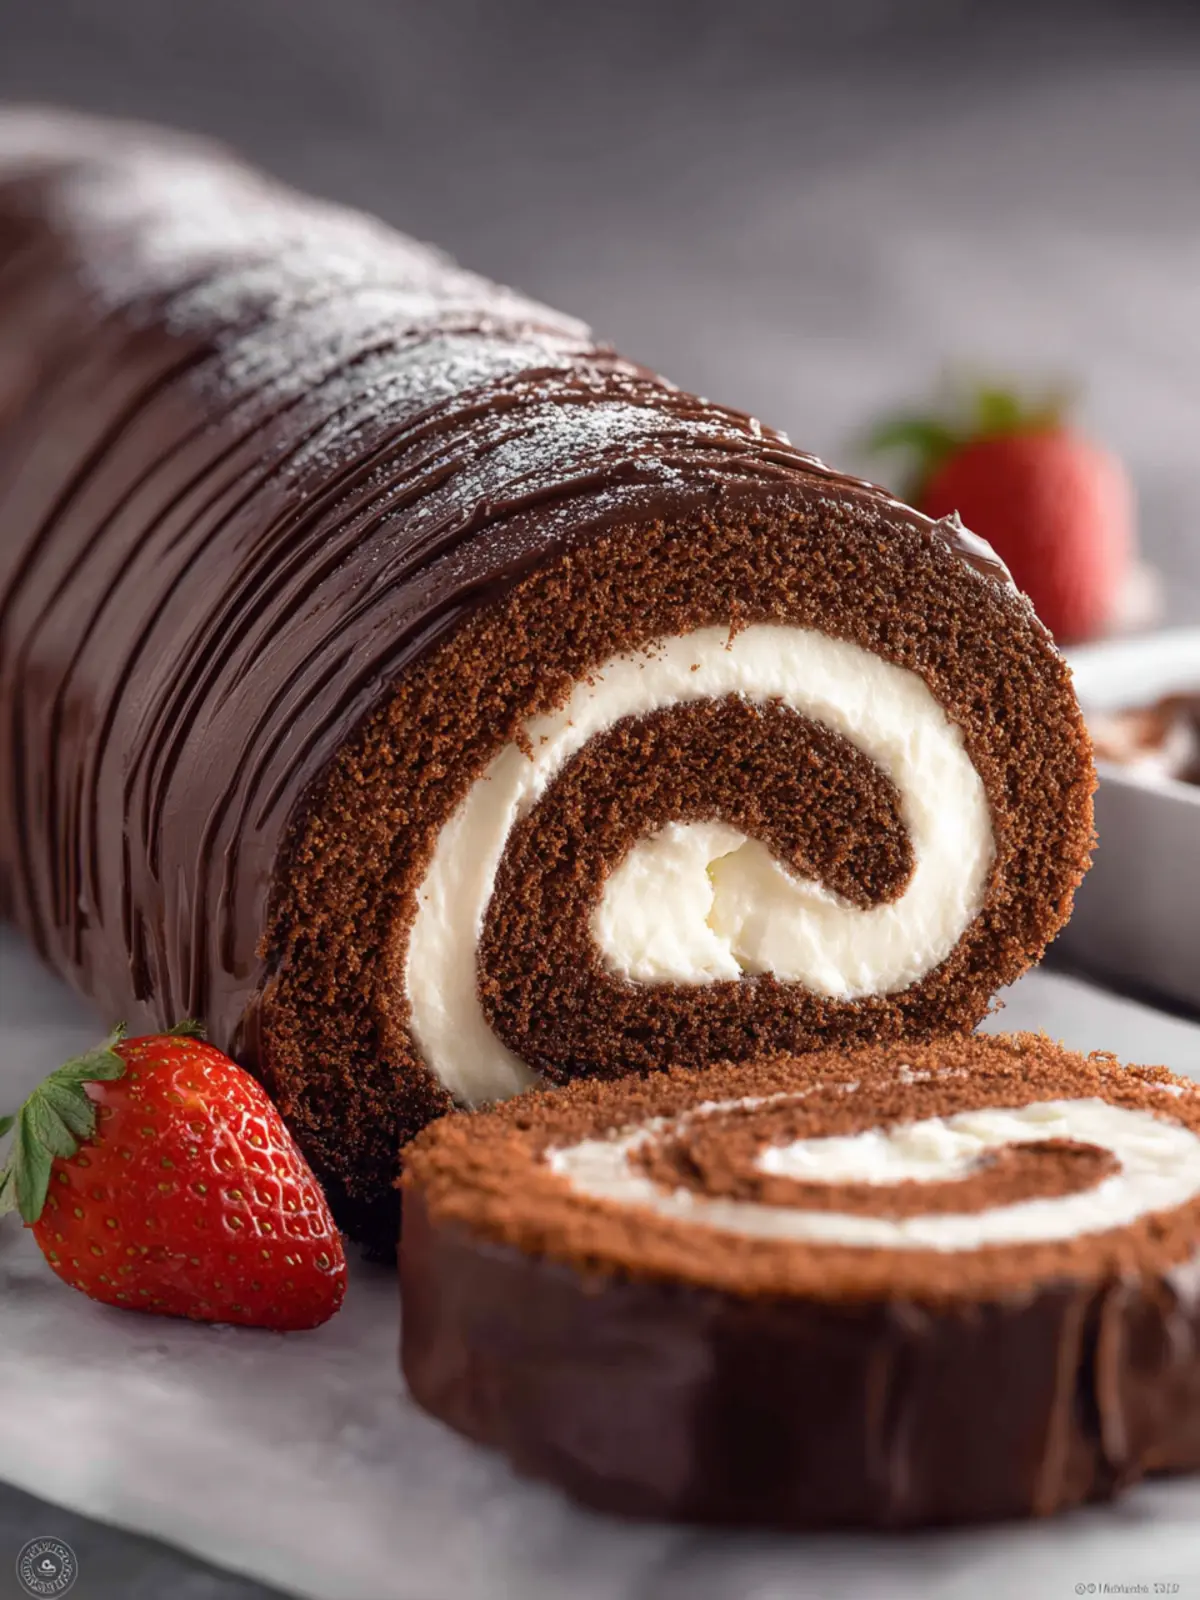
Chocolate Swiss Roll: The Indulgent Treat You’ll Adore
Introduction to Chocolate Swiss Roll
Imagine a world where decadent chocolate cake intertwines with velvety cream, creating an indulgent chocolate swiss roll that transports you to dessert heaven with each bite. This classic treat is not just a feast for the eyes but also a delight for the taste buds, offering a perfect harmony of textures and flavors. Its elegant presentation and the ability to serve it at any occasion—be it a cozy dinner party or a spontaneous gathering—makes the chocolate swiss roll a versatile favorite.
Baking a chocolate swiss roll combines artistry with culinary skill. The primary appeal lies in its mesmerizing spiral design, which is often met with oohs and ahhs when sliced. But it’s not merely about looks; the rich chocolate flavor paired with the fluffiness of the sponge and a luscious filling makes it an unforgettable dessert. The light sponge gently hugs the creamy filling, offering a playful contrast as you slice through it.
What makes a Chocolate Swiss Roll so delightful?
-
Texture: The lightness of the sponge cake enveloping the rich, creamy filling creates a delightful experience for your palate. This dynamic duo of textures is truly hard to resist.
-
Flavor: The intense chocolate notes will captivate chocolate lovers, while the creamy filling offers a touch of sweetness that balances the overall flavor spectrum. Add a dusting of cocoa or powdered sugar on top, and it’s as appealing visually as it is delicious.
-
Versatility: A chocolate swiss roll can be adapted to suit various tastes. Want a hint of fruitiness? Swap in a raspberry or orange filling. Prefer a more aromatic twist? Experiment with a hint of coffee or mint.
Whether you’re a seasoned baker or a beginner, mastering the art of the chocolate swiss roll is immensely rewarding. It’s perfect for showing off your culinary prowess while also being a delightful treat to enjoy over a cup of tea or coffee. So why not roll up your sleeves and embrace this delicious journey? Your taste buds will thank you!
Key Ingredients for Chocolate Swiss Roll
Creating a delightful Chocolate Swiss Roll is both an art and a science, largely defined by the selected ingredients. Each component contributes uniquely to that irresistible flavor and texture, ensuring your roll is a showstopper.
Flour
All-purpose flour is the backbone of your chocolate swiss roll. It provides the necessary structure while keeping the sponge light and airy. A careful balance is key here; too much flour can lead to a dense cake, which we want to avoid.
Cocoa Powder
Unsweetened cocoa powder is the star of the show, lending that rich and deep chocolate flavor everyone loves. It’s essential for achieving a beautifully chocolaty sponge, elevating your dessert from ordinary to extraordinary.
Eggs
Large eggs play a crucial role in providing moisture and helping the batter rise. They incorporate necessary air, which allows your chocolate swiss roll to achieve its delightful fluffy texture. Fresh eggs yield the best results!
Sugar
Granulated sugar sweetens the batter, enhancing the overall flavor of the roll. Meanwhile, powdered sugar is perfect for dusting the top and incorporating into the cream filling, giving it a beautiful finish.
Cream Cheese
For the filling, cream cheese adds a rich and creamy texture that beautifully balances the chocolatey sponge. This not only enhances the flavor but also creates a luxurious mouthfeel.
Chocolate Chips
Lastly, dark or semi-sweet chocolate chips can be folded into the ganache, delivering an extra layer of decadent chocolate flavor. These little morsels add a delightful surprise with every bite, making your chocolate swiss roll unforgettable.
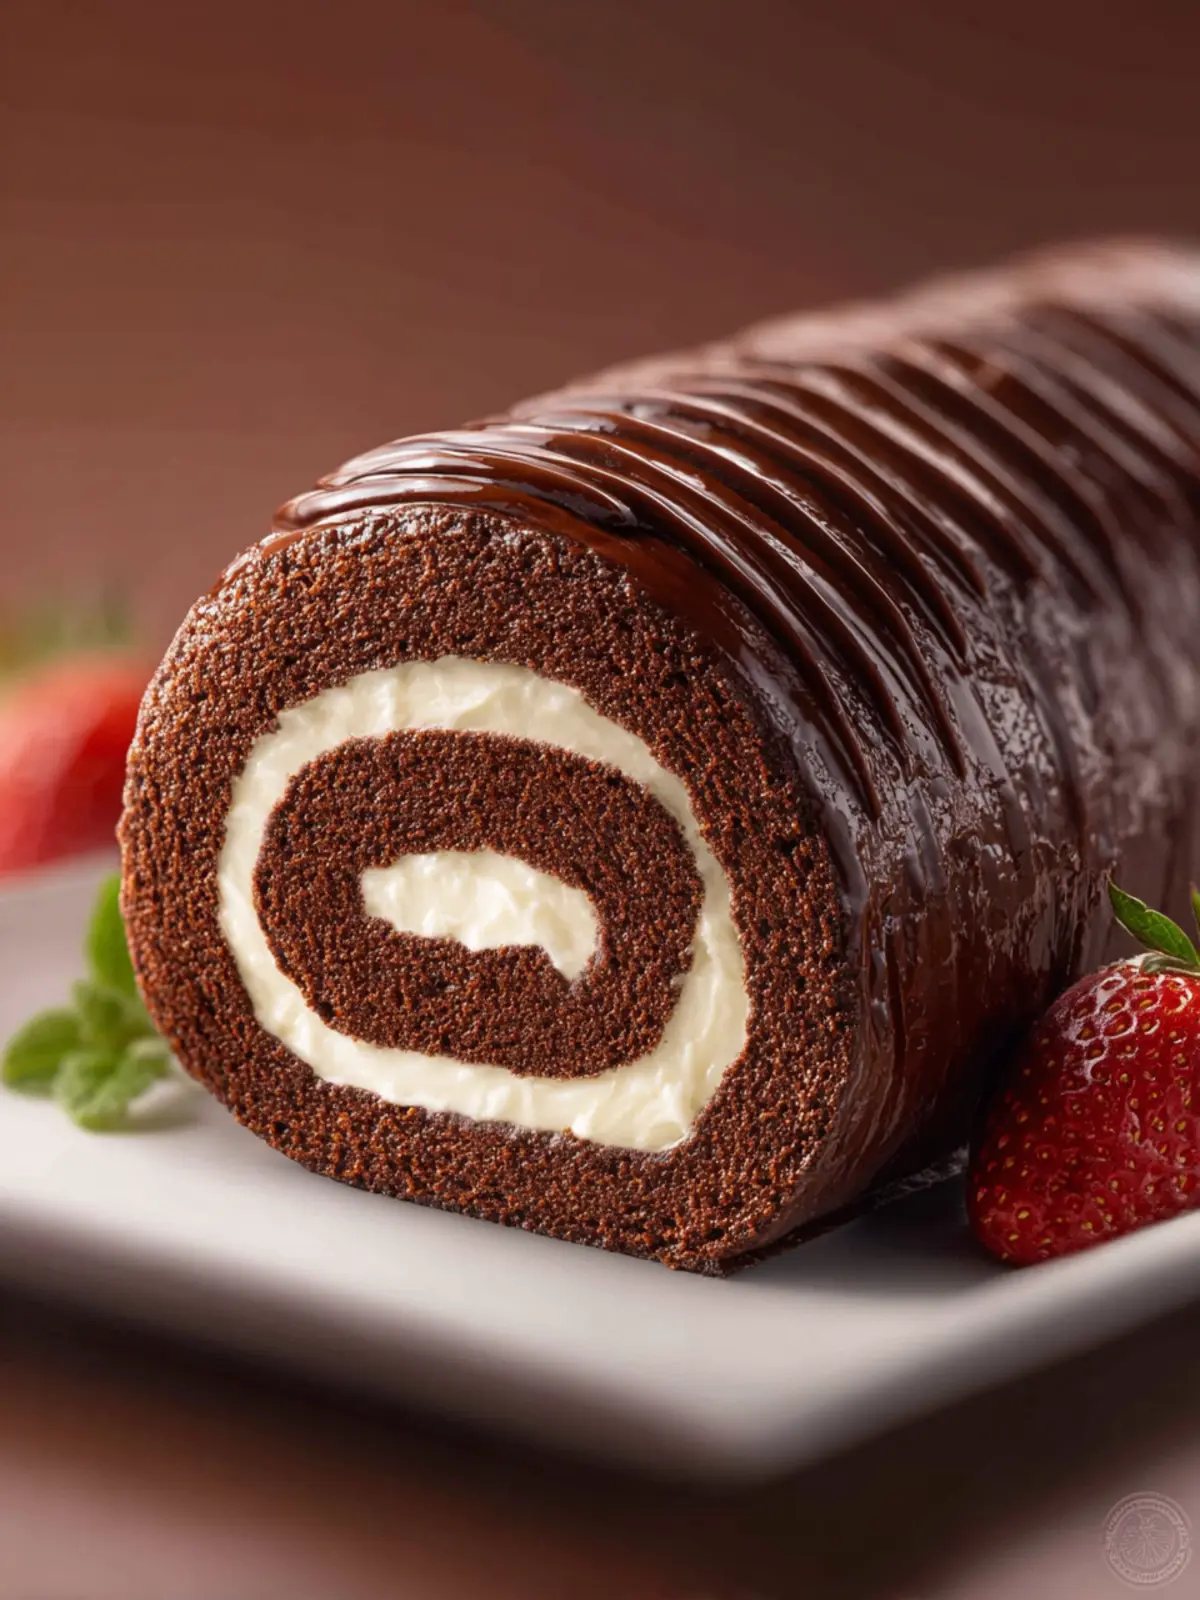
Why You’ll Love This Chocolate Swiss Roll
There’s a certain charm to a chocolate swiss roll that transports you right back to childhood. Remember the excitement of slicing into that beautifully coiled cake, only to reveal a gorgeous swirl of chocolate goodness? This delightful dessert is not just about looks; it’s about an explosion of flavor and texture that keeps you coming back for more.
The Perfect Dessert for Any Occasion
Whether it’s a birthday celebration, a cozy get-together, or just a casual Tuesday evening, this chocolate swiss roll is the perfect companion. Its rich, moist chocolate sponge cake envelops a luscious filling, creating layers of flavor that dance on your palate. Plus, it’s surprisingly easy to make! Guests will be impressed by your baking prowess, and you can bask in the compliments while enjoying a slice yourself.
A Versatile Treat
What adds to the allure is its versatility. You can serve it plain, dusted with powdered sugar, or dress it up with whipped cream and fresh berries. The options are as endless as your imagination. Each bite offers that perfect combination of softness and indulgence, making every occasion feel a little more special.
So grab your whisk, and let’s whip up a chocolate swiss roll that will have everyone raving!

Tips for Making the Perfect Chocolate Swiss Roll
Creating a flawless chocolate swiss roll can feel like a daunting task, but with a little know-how and a positive mindset, you’ll find it to be an enjoyable baking adventure. Here are some tried-and-true tips to ensure your roll is as impressive as it is delicious.
Choose the Right Ingredients
Using high-quality ingredients can greatly enhance your chocolate swiss roll. Opt for premium cocoa powder for a rich chocolate flavor. Also, ensure your eggs are fresh, as they’re crucial for the structure and fluffiness of your sponge.
Carefully Prepare the Pan
Greasing and lining your baking tray properly makes all the difference. Use parchment paper to cover the bottom and sides of the tray, which will help in easy removal post-baking. To prevent the roll from sticking, lightly dust the parchment with cocoa powder.
Master the Rolling Technique
As soon as your sponge comes out of the oven, flip it onto a clean kitchen towel dusted with powdered sugar. This helps prevent sticking. Roll it up tightly while it’s warm, allowing it to cool in the rolled position. This step is crucial for achieving that perfect swirl when you unroll it later.
Don’t Rush the Filling
Give your filling enough time to achieve the right consistency. If using whipped cream, it should hold stiff peaks without being overly soft. This stability ensures that your roll stays intact and doesn’t collapse during slicing.
With these tips, your chocolate swiss roll will impressingly rise and roll, making it a delightful centerpiece for any occasion. Happy baking!
Time Breakdown for Chocolate Swiss Roll
Creating a beautiful chocolate swiss roll is a delightful process that combines precision and creativity. Here’s a quick breakdown of the time you’ll invest in making this delicious treat, ensuring you can plan out your baking adventure effectively.
Preparation time
You’ll need about 15 minutes to gather your ingredients and mix the batter. This is where the magic begins, and the delicious aroma will start wafting through your kitchen.
Baking time
Baking the chocolate swiss roll takes approximately 12-15 minutes. Keep a close eye on it; the cake should spring back when touched lightly.
Cooling time
Let your swiss roll cool for about 10 minutes in the pan before transferring it to a wire rack. This helps ensure that when you roll it, it stays intact and maintains its shape.
Total time
In total, expect the entire process to take around 40 minutes, plus additional time for filling and decorating. Your delightful chocolate swiss roll will be ready to impress in no time!

Nutritional Facts for Chocolate Swiss Roll
Making a Chocolate Swiss Roll is as much about enjoying the delicious treat as it is about understanding its nutritional content. Let’s break down the key components of this delightful dessert to help you enjoy it mindfully.
Calories
A standard serving of Chocolate Swiss Roll typically packs around 250 calories. While it’s a delightful indulgence, savoring it in moderation can help you maintain your balance.
Protein
Each slice offers approximately 5 grams of protein, thanks to the eggs and dairy in the recipe. This protein content can aid in keeping you satisfied longer.
Carbohydrates
With around 40 grams of carbohydrates per slice, the sweetness of the Chocolate Swiss Roll comes from the sugars and flour used in the recipe. It’s perfect for a quick energy boost during the afternoon slump.
Fat
Each serving contains about 10 grams of fat. Most of this comes from butter and cream, contributing to that wonderfully rich flavor many of us crave in desserts.
Knowing these nutritional facts allows you to enjoy the scrumptiousness of Chocolate Swiss Roll while keeping an eye on your overall intake.
FAQs about Chocolate Swiss Roll
When it comes to baking an indulgent chocolate Swiss roll, questions are bound to arise. Let’s explore some of the most common ones to help you master this delightful dessert!
How do I prevent my Swiss roll from cracking?
Cracking is a common concern when rolling your cake. To minimize this, ensure you:
- Cool Gradually: After baking, let the cake cool in the pan for about 10 minutes before transferring it to a cooling rack. This gradual cooling helps it maintain flexibility.
- Use Parchment Paper: Line the baking pan with parchment paper and allow some overhang. This makes it easier to remove the cake without damaging it.
- Roll While Warm: Roll the Swiss roll when it’s still a bit warm. This helps the cake retain its shape. If you find any cracks, don’t fret! You can cover them up with filling or ganache.
Can I make this Swiss roll ahead of time?
Absolutely, a chocolate Swiss roll is perfect for making ahead! You can prepare it a day in advance, just be sure to wrap it tightly in plastic wrap to keep it fresh. It can also be frozen for up to a month. Just thaw it overnight in the refrigerator before serving.
What variations can I try for the filling?
Unleash your creativity! While a classic chocolate ganache is divine, you might explore:
- Fruit Fillings: Raspberry or strawberry preserves provide a delightful fruity contrast.
- Cream Cheese Fillings: For a tangy twist, blend cream cheese with powdered sugar and vanilla.
- Nutella or Peanut Butter: These options add richness and flavor that chocolate lovers will adore!
How do I store leftover Swiss roll?
To keep your chocolate Swiss roll fresh:
- Refrigerate: Store it in an airtight container in the fridge for up to 3 days.
- Freeze: For longer storage, slice the Swiss roll and wrap individual pieces in plastic wrap, then place them in a freezer-safe bag. They can last for about a month in the freezer.
With these tips, you’re well on your way to enjoying a perfect chocolate Swiss roll every time!
Conclusion on Chocolate Swiss Roll
In wrapping up our delicious journey into the world of the chocolate swiss roll, it’s clear that this recipe not only dazzles with its rich flavors but also embraces creativity and tradition. As you roll out your masterpiece, remember that perfection often lies in the details — from the airy texture of the sponge to the luscious filling.
This dessert can easily become a family favorite, perfect for celebrations or a sweet treat during a quiet evening. Don’t hesitate to explore variations with your favorite fillings! Next time you’re in the kitchen, let the allure of the chocolate swiss roll inspire your culinary adventures. Enjoy baking!
Print
Chocolate Roll Cake
- Total Time: 2 hours
- Yield: 8 servings 1x
- Diet: Vegetarian
Description
A delightful chocolate roll cake filled with a creamy mixture, perfect for any occasion.
Ingredients
Scale
- ½ cup all-purpose flour
- ¼ cup unsweetened cocoa powder
- 1 tsp baking powder
- ½ tsp salt
- 4 large eggs
- ½ cup granulated sugar
- 2 tbsp melted butter
- 1 tsp vanilla extract
- 8 oz. brick cream cheese (room temperature)
- 2 cups powdered sugar
- 4 tbsp unsalted butter (softened)
- 1 tsp vanilla extract
- ⅔ cup dark or semi-sweet chocolate chips
- 2 tbsp heavy whipping cream
- 4 tbsp powdered sugar
- 3–4 tbsp milk
- 2 tbsp powdered sugar
Instructions
- Heat the oven to 350°F. Lightly coat a 15×10-inch jelly roll pan with nonstick cooking spray. Then line it with parchment paper, leaving an extra 1″ overhang.
- In a medium bowl, whisk together flour, cocoa powder, baking powder, and salt until combined.
- In a separate bowl, whisk together the eggs and granulated sugar until combined and thickened. Add in the melted butter and vanilla extract, and whisk until just combined.
- Fold the flour mixture into the wet mixture with a rubber spatula, and stir together until just combined.
- Pour batter into prepared pan and spread to an even layer. Bake for 11 minutes, or until top of cake springs back when touched. Do not over bake.
- Lay a clean, unscented, lint-free tea towel on a flat surface. Sprinkle with 2 tbsp of powdered sugar.
- Gently turn the cake out onto the towel and very carefully and slowly remove the parchment paper. While still hot, roll the cake up in the towel (yes, you want the towel to be rolled up inside), from short end to short end. Cool completely to room temperature on a wire rack, while rolled up, about 90 minutes.
- With an electric mixer, beat together cream cheese, powdered sugar, butter, and vanilla in a mixing bowl until smooth. (If the filling is too thin, add more powdered sugar. If it is too thick, add a teaspoon or two of milk. You want a medium consistency so that the filling is easy to spread, but not too warm or thin that it will ooze out of the cake when you’re rolling it up.)
- Once the cake roll has reached room temperature, transfer it to a flat surface, and carefully unroll it until it is flat again (or mostly flat, it’s ok if the ends curl up a bit).
- Spread the filling mixture evenly over the cake, leaving a ¾” border on all sides. Then carefully re-roll the cake.
- Tightly wrap the chocolate roll in plastic wrap and refrigerate at least one hour to help the filling firm up a bit.
- Place the chocolate chips and whipping cream in a medium-sized microwave-safe bowl. Microwave in 30-second intervals until melted; whisk until combined. Then whisk in the powdered sugar until combined. Add milk, one tbsp at a time, until a pouring consistency is reached.
- Trim the ends of the cake for a clean look. Transfer to a cooling rack with a cookie sheet underneath (for a cleaner finish), and pour ganache evenly over the top. Let set.
- Transfer to a serving plate, slice, and enjoy!
Notes
- Ensure the cake is completely cool before adding the filling to avoid melting.
- Feel free to use different types of chocolate chips for varied flavor.
- Prep Time: 30 minutes
- Cook Time: 11 minutes
- Category: Dessert
- Method: Baking
- Cuisine: American
Nutrition
- Serving Size: 1 slice
- Calories: 250
- Sugar: 22g
- Sodium: 150mg
- Fat: 10g
- Saturated Fat: 6g
- Unsaturated Fat: 4g
- Trans Fat: 0g
- Carbohydrates: 35g
- Fiber: 1g
- Protein: 5g
- Cholesterol: 80mg